
Something that happened and PIN is not available is an issue that occurs in Windows 10 when users aren't able to log in to their computer when they enter the PIN. This usually happens if you have a Microsoft account on your computer. Windows generally has two types of accounts. One is a local account and the other one is a Microsoft account. No email ID is used in the local account and Microsoft ID is used in the Microsoft account.
When users select the set up my PIN option, they get redirected to the same page where they see the same error code. This is an ongoing issue by Microsoft and the company has not released any concrete solution for the same. Many workarounds have been suggested by the users. However, no official response has been received from Microsoft yet.
This error message appears because of the PIN service running on your Windows computer. The service that is responsible for managing PINs is not working properly and when you try to add a new PIN, it fails to respond.
This is an ongoing problem with Windows and Microsoft has not come up with a concrete solution to fix this problem. Usually, people are stuck in two situations when they see this error message. One problem is that they are not able to cross the login screen.
They get logged out and they can't find any way that can help them log in. The other situation is that they are able to log in to the system by entering a password; which is an alternative to a PIN.

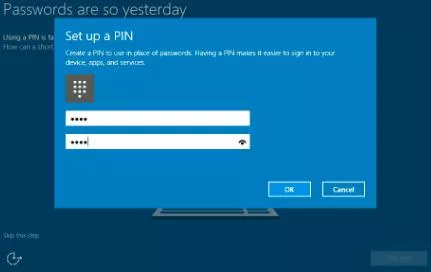
When this error appears, it does not let users access their Windows machines. In some cases, the safe mode is not accessible. This further complicates the issue and your device is at the risk of losing data when you reset your system. In this case, you need to perform the steps to set up your PIN one more time.
If you get locked out, then you must enter the recovery environment and resolve your problem. Here, we are going to edit the registry of your computer and make changes to the keys that will help you get rid of your problem. Here in this solution, we are assuming that your Microsoft account is linked to a computer.
There are Two Options
a) Force Windows to Use a Password at the Time of Logging in.
b) In case you have never used a password before, then it is not going to work even if you are entering the right one. Here, you are required to make some additional changes in the registry to validate the password from the servers.
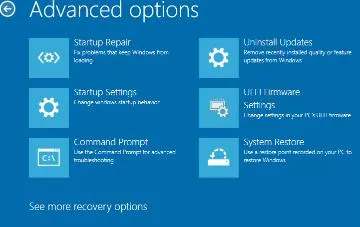
Step 1: To enter the recovery environment from the login screen, press the shift key and hold it while pressing restart on the login screen. This will force windows to restart and show you some recovery options.
Step 2: After that, select the troubleshoot option, then advanced options, and then finally select the command prompt.
Step 3: Then, enter Regedit in the command prompt and then press the enter key.
Step 4: Keep in mind that this registry is not the registry of your computer. It belongs to the Windows registry environment. If you wish to access the installed windows registry, then you are required to load the registry manually.
Step 5: Select the key "HKEY_LOCAL_MACHINE" and select the File followed by Load Hive.
Step 6: After that. load the Software Hive.
Step 7: Once you are done selecting, you need to enter a valid name. You are just required to add an extra word like Ssoftware and you will see a new entry under HKLM
When you make changes to the 'DevicePasswordLessBuildVersionKey', you will turn off the "Require Windows Hello message, which is the main reason why a lot of users get locked out of their PC.
With this, the option to enter the password will get unlocked and you can use your Microsoft account password instead of the PIN.
Step 1: Go to the location mentioned below. Please keep in mind that we navigated to the Software that was named earlier.
HKEY_LOCAL_MACHINE\ssoftware\Microsoft\Windows NT\CurrentVersion\PasswordLess\Device
Step 2: After that, change the key of "DevicePasswordLessBuildVersion" from 2 to 0 and then save the changes.
Step 3: Restart your PC and try to access your account by entering the password.
If you are entering the right password for your Microsoft account and you are not able to log in, then that means you have never used the password on this device. This can also mean that you changed the password after you last used this device. To fix this issue, you may need to add access to Windows to the network. This will allow you to match the password at the time of logging in.

How to Connect Airpods to Laptop
~ May 23, 2026
My Computer is Running Slow What Steps can I Do to Fix It
~ May 23, 2026
Spot Geek Squad Scams: Safety Tips 2026
~ May 23, 2026
How To Fix Your Laptop Overheating Problem
~ May 23, 2026
How to Fix Laptop Speakers not Working
~ May 23, 2026
How to Download Snapchat Without the App Store PC Guide
~ May 23, 2026
How to Fix Something Happened and Your PIN isn’t Available
~ May 23, 2026
Fix the Lenovo PC Error 1962: No Operating System Found
~ May 23, 2026
Top Searches in Laptop
Fix the Lenovo PC Error 1962: No Operating System Found
May 23, 2026How to Fix Something Happened and Your PIN isn’t Available
May 23, 2026Spot Geek Squad Scams: Safety Tips 2026
May 23, 2026Do You Really Need Bonjour on Your Computer
May 23, 2026How to Download Snapchat Without the App Store PC Guide
May 23, 2026How to Use Bluetooth to Connect a Wii Remote to a PC
May 23, 2026How to Fix Laptop Speakers not Working
May 23, 2026How to Improve Sound Quality on Laptop & PC
May 23, 2026How To Fix Your Laptop Overheating Problem
May 23, 2026My Computer is Running Slow What Steps can I Do to Fix It
May 23, 2026