Please let me know that how to add signature in word Windows 10 and Mac. I am facing some issues while trying to do this. Help me.
A handwritten signature adds a personal touch to a document. You can easily scan your signature and store it to add it to a document. Moreover, you can add a signature line to check where the signature should be written.
Below are the steps that you need to follow to add a handwritten signature in word on Windows.
Step 1: Write your signature on a piece of paper.
Step 2: Scan your page and save it on your PC's common file format .bmp, .gif, .png, .jpg. If you want details on how to use a scanner, then go to the main website or use the manufacturer's manual.
Step 3: Open the file.
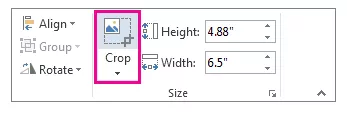
Step 4: Now, to crop the image, go to the Format tab, select crop, and then finally crop the image.
Step 5: After that, you need to right-click on the image and then save the picture as a separate file by selecting the option of "Save as Picture".
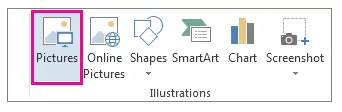
Step 6: If you wish to add a signature to a document, select Insert and then finally select Pictures.
If you wish to add more information to your signatures such as your email address, phone number, or job title. Save it together with a picture as auto text.

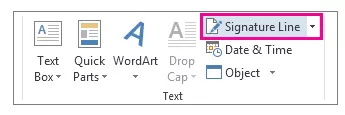
Use the command of Signature line for inserting a signature line with an X to know where to sign the document.

Below are the steps that you need to follow to add a handwritten signature in word on Mac.
Step 1: Write your signature n a piece of paper.
Step 2: Scan the page and then save it on your PC in a common file format such as .PNG, .JPG, .GIF, .BMP.
Step 3: Now, go to the Insert tab and then select Pictures. After that, go to Pictures from File.
Step 4: Search for the picture that you wish to insert. After that, select the option of Insert.
Step 5: Select the picture to show the tab of "Picture Format"
Step 6: Select the crop option from the Picture Format tab. After that, crop your signature.
Step 7: Then, right-click on the picture and then select the option of Save as Picture to save it as a separate file, which you can use in other documents.
If you wish to add more information like email address, phone number, job title in your signature. Save it with a picture as auto text.
Step 1: Enter the text that you wish to enter under inserted picture.
Step 2: Choose the picture and the typed text.
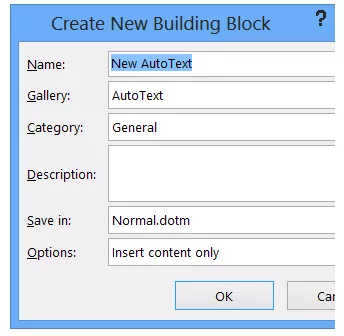
Step 3: Go to the menu of Insert and select AutoText and then go to New.
Step 4: After that, create a new AutoText box will open up.
Step 5: When you wish to use this signature, select the insertion point where you want to insert the signature block.
Step 6: Go to the menu of Insert. After that, select Auto Text and then select the name of your signature block.
Windows 11 Controller not Working - How to Quickly Fix It?
How to Adjust Brightness, Screen Color, Contrast and Gamma on PC?
How to Clear Cache in Windows 11?
How to Format an NVME SSD on Windows 11?
How to Run Android Apps on Windows 10?
How to Change Monitor Number in Windows Display Settings?
How to Fix Game Opening on the Wrong Monitor?
How to Change the Keyboard Settings to Default on Windows 11?

How to Get Purble Place on Windows 11/10?
~ May 23, 2026
How to Check CPU Temperature Windows 11?
~ May 23, 2026
How to Record Your Screen on Windows 11
~ May 23, 2026How to Fix Icons in Windows 11
~ May 23, 2026
How do I Fix Error Code 0x80070570 on Windows 10
~ May 23, 2026
Fix Touchpad Gestures Are Not Working on Windows 11
~ May 23, 2026
How to Fix the WHEA Uncorrectable Error on Windows 10
~ May 23, 2026
Top Searches in Windows 10
How to Find Windows 10 Product Key 2026?
Dec 8, 2025How to Convert FireWire Connections to USB?
Dec 8, 2025How do I Unlock my Keyboard on Windows 10?
Dec 8, 2025How do I Fix the Unresponsive Taskbar in Windows 10?
Feb 23, 2024How to Install the Amazon Prime Video App on Windows 10?
Dec 8, 2025How to Recover Uninstalled Programs on Windows 10?
Dec 8, 2025Do I Really Need Realtek High Definition Audio in Windows 10?
Dec 8, 2025How to Enable Bitlocker on Windows 10 Home?
Dec 8, 2025How to Change Network Binding Order in Windows 10?
Dec 8, 2025How do I Turn Off Windows Volume Overlay?
Dec 8, 2025