Chrome Keeps Flickering in Windows 11: Fix It
Chrome is known for its impeccable performance but there may be occasions when you will observe that Chrome keeps flickering in Windows 11. This unwanted scenario may be due to an outdated browser or because of some non-permissible Extensions which can easily be fixed by having regard to this detailed guide that is suitably drafted to come in handy anytime.
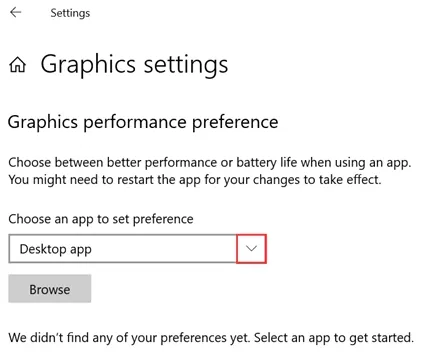
You can begin by Adjusting the Graphic Settings
Step 1 - Just initiate by pressing the “Start” menu followed by selecting the “Settings” option.
Step 2 - Now continue by clicking on the “System” heading shown leftwards followed by hitting the “Display” option.
Step 3 - Just navigate down a little and reach the “Scale & Layout” segment. Therein just click on the “Display Resolution” section and choose the resolution which is lower than the current one.
Updating the Graphic Drivers is Another Option
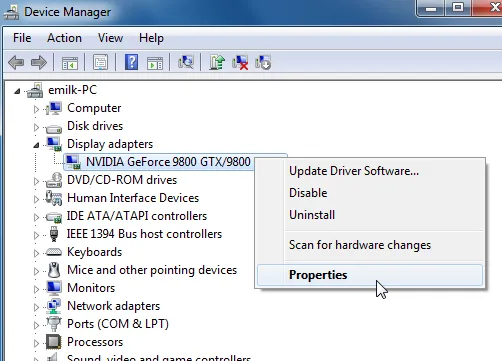
Step 1 - Here you can begin by clicking on the “Windows” button followed by opening the “Device Manager” section after typing the same in the “Search Field”.
Step 2 - Navigate a little more to find the “Display Adapters” followed by selecting the “Graphics Card” and further clicking on the “Update” driver.
Step 3 - Now press the “Search automatically for drivers” button which will undoubtedly help you fix the Chrome keeps flickering in Windows 11 issue.
Opting to Re-Install the Graphic Drivers
Step 1 - Again resort to opening the “Device Manager” by virtue of clicking on the “Windows” button.
Step 2 - Now, navigate further to find the “Display Adapters” button and right-click on the relevant graphics card and select the “Uninstall Device” option subsequently.
Step 3 - Give your due confirmation for the uninstallation process to take effect followed by restarting your PC which will eventually re-install the latest graphics drivers.
Performing a Cleanup Scan on your Chrome Browser
Step 1 - First, launch the Chrome browser followed by clicking on the three vertical dots shown on the top right corner of the screen.
Step 2 - Now click on the “Settings” option followed by clicking on the “Reset and Clean Up” segment displayed on the lower segment.
Step 3 - Thereafter, just press the “Clean Up Computer” button followed by hitting the “Find” button shown adjacent to the “Find Harmful Software” heading.
Step 4 - Finally, you will have to wait for the scan to get over so that the issue of Chrome keeps flickering in Windows 11 is fixed.
Disabling the Hardware Acceleration may also Work
Step 1 - In this method of fixing the Chrome keeps flickering in Windows 11 issue you again have to click on the three vertical dots at the top right corner of the screen.
Step 2 - Now click on the “Settings” option followed by pressing the “System” button shown on the leftward pane.
Step 3 - Toggle off the button being displayed against the “Use Hardware Acceleration when available” heading.
Restoring the Default Settings on Chrome can also be Resorted to
Step 1 - Click on the “Settings” option after clicking on the three vertical dots of Chrome’s home page.
Step 2 - Click on the “Reset and Clean Up” segment reflected on the pane provided leftwards followed by pressing the “Restore settings to their original defaults”.
Step 3 - Now, in the next dialog box that subsequently appears just press the “Reset Settings” button which will eventually help you fix the Chrome keeps flickering in Windows 11 issue.
- Published by: Mick
- Category: Browser
- Last Update: 5 days ago
Related Blog
How to Delete Cookies in Every Major Browser
~ Dec 8, 2025How to Fix Msxml4.dll Not Found or Missing Errors
~ Dec 8, 2025How to Remove Bing From Windows 11
~ Dec 8, 20257 Safari ad Blockers to Try Right Away
~ Dec 8, 2025How to Show Passwords in Chrome
~ Dec 8, 2025Chrome Keeps Flickering in Windows 11: Fix It
~ Dec 8, 2025Bypass Failed Virus Detected Download Error in Chrome
~ Dec 8, 2025How to Unblock Websites on Chrome
~ Dec 8, 2025Featured Blog
How to Fix Error Code csc_7200026 on AliExpress
Dec 8, 2025How to Cancel Your Club Pogo Account
Dec 8, 2025DuckDuckGo Not Working? Why & How to Fix it
Dec 8, 2025How to Register a Supercell ID Account?
Dec 8, 2025Spot Geek Squad Scams: Safety Tips 2025
Dec 8, 2025Top Questions
How to Find Windows 10 Product Key 2025?
Dec 8, 2025How to Increase Wifi Speed in laptop Windows 10?
Dec 8, 2025How to Convert FireWire Connections to USB?
Dec 8, 2025How do I Unlock my Keyboard on Windows 10?
Dec 8, 2025How to Create a Roku Channel in 3 Steps?
Dec 8, 2025How to Fix Gmail App Keeps Crashing Problem?
Dec 8, 2025Categories
- OTT
- 616 ~ Articles
- Windows
- 491 ~ Articles
- 164 ~ Articles
- Browser
- 145 ~ Articles
- Laptop
- 72 ~ Articles
- Antivirus
- 40 ~ Articles
Top Searches in Browser
DuckDuckGo Not Working? Why & How to Fix it
Dec 8, 2025What is Wave Browser? 10 Ways to Remove it (Windows, Mac)
Dec 8, 2025Bypass Failed Virus Detected Download Error in Chrome
Dec 8, 2025How to Fix Browser Does not Support HTML5 Video
Dec 8, 20257 Safari ad Blockers to Try Right Away
Dec 8, 2025Chrome Keeps Flickering in Windows 11: Fix It
Dec 8, 2025Failed Virus Detected Download Error in Chrome
Dec 8, 2025How to Enable a QuickTime Plugin in Firefox
Dec 8, 2025How to Fix It When Microsoft Edge Is Not Working
Dec 8, 2025How to Easily Disable Download Panel Automatic Opening in Firefox
Dec 8, 2025