How to Access Yahoo Mail With Outlook
Mapping your Yahoo email with Outlook can be a great idea as you can leverage the combined technological capability of Yahoo mail along with Outlook with an expanded scope to access Yahoo Mail with Outlook all the time. The idea to access Yahoo Mail with Outlook is pretty futuristic as it enables an enriching experience while communicating with colleagues, clients, and business associates.
Friends, I also wanted to access Yahoo Mail with Outlook to accomplish this I executed a two-factor authentication process followed by configuring my Yahoo Mail with the Outlook application. In due course of mapping my Yahoo Mail with the Outlook application, I came across another regular way to access Yahoo Mail with Outlook.
In this context, I take this opportunity to share herewith the detailed guide suggesting the process of configuring your Yahoo Mail with the Outlook application.
Primary Step - Making your Yahoo Mail ready for configuration with the Outlook application
Method 1 - By Implementing the Two-Factor Authentication Process

Step 1 - First you have to make sure that the two-factor authentication is enabled.
Step 2 - Now you have to keep in mind that you have to generate the third-party app password which you have to enter at the time of configuring your Yahoo Mail with the Outlook application.
Method 2 - In Case you Wish to Prepare your Yahoo Mail for Configuring it with Outlook by Implementing the Regular Process
Step 1 - Primarily, you are required to log in to your Yahoo Mail account.
Step 2 - Now you should select the “Accounts Info” after choosing the respective “profile name” from the “Profile” option displayed on the top-right corner of the Yahoo Mail web page.
Step 3 - Now continue by choosing the “Account Security” option shown on the menu pane leftwards.
Step 4 - Now directly click on the “Generate app password” option to generate the password followed by simultaneously choosing the version of your Outlook that you need to configure with your Yahoo Mail.
Step 5 - Now opt to click on the “Generate” followed by clicking on the “Done” option being displayed on the window that pops up as a result of clicking on the “Generate” option.
Method 3 - Configuring Your Yahoo Mail with your Outlook Application If you have Microsoft 365, Outlook 2019, or Outlook 2016
Step 1 - Initially you just have to click on the “File” menu.
Step 2 - Prefer to click on the “Add Account” button after choosing to click on the “Info” option shown on the menu leftwards.
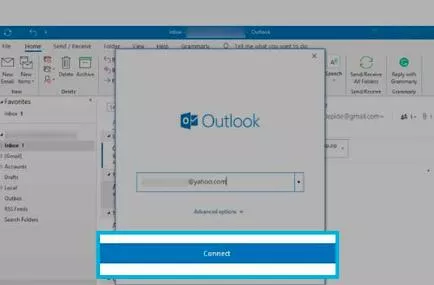
Step 3 - Just punch in your email address followed by clicking on the “Connect” button.
Step 4 - Now enter your app password. Please do remember that if you used the two-factor authentication process then here in the box prompting you to enter the password, you must enter the password that you generated earlier in the primary step.
Step 5 - Finally, choose to click on the “Connect” button.
Facilitating the Configuring of Your Yahoo Mail with Your Outlook Application in Case you have Outlook 2013 or Outlook 2010
Step 1 - Here also you have to click on the “File” menu button followed by selecting the “Info” option and then preferring to click on the “Add Button” option.
Step 2 - Now in the new screen that gets popped up you will have to see and click on the “Manual setup or additional server types” followed by clicking on the “Next” button.
Step 3 - Now select the POP or IMAP radio button followed by choosing the “Next” button.
Step 4 - Further in the “Server Information” option continue by clicking on the “Account Type” drop-down menu followed by selecting the “IMAP” option ultimately.
Step 5 - Just under the “User Information” section enter your name and email address.
Step 6 - Now here you are required to enter the “Server Information” settings. For the Incoming Mail Server just enter imap.mail.yahoo.com followed by entering smtp.mail.yahoo.com in the Outgoing Server.
Step 7 - Now in the login information section just check whether your username reflected has been correctly retrieved from your email. Also, you must now enter the app password (In case of two-factor verification just enter the newly generated password).
Step 8 - Now you must go to the Outgoing Server and facilitate entering the same settings as you did in case of the incoming server. To get this done, select the “Outgoing Server” tab followed by selecting the “My outgoing server requires authentication” check box. Thereafter, choose “Use same settings as my incoming mail server”.
Step 9 - Now go to the “Advanced Tab”.
Step 10 - Now for the Incoming Server and Outgoing Server choose “Use the following type of encrypted connection drop-down” followed by choosing the SSL.
Step 11 - Then prefer entering “993” in the incoming server text box followed by entering “465” in the outgoing server text box.
Step 12 - Now choose to select the “OK” option to return to the POP and IMAP Account Settings window.
Step 13 - Select pressing the “Test” option followed by clicking on “Close” after the tests have been successfully carried out by the system.
- Published by: Mick
- Category: Email
- Last Update: 5 days ago
Related Blog
How to Login Network Solutions Webmail?
~ Dec 8, 2025How to Login Charter.net (Spectrum) Email?
~ Dec 8, 2025How to Fix Bigpond Email Not Working on iphone?
~ Dec 8, 2025Optimum Email Not Working | How to access Optimum Email?
~ Dec 8, 2025How to Sign into Bresnan.net (Spectrum) Email?
~ Dec 8, 2025How to Register a Supercell ID Account?
~ Dec 8, 2025How to Login to Telstra Bigpond Email?
~ Dec 8, 2025Featured Blog
How to Fix Error Code csc_7200026 on AliExpress
Dec 8, 2025How to Cancel Your Club Pogo Account
Dec 8, 2025DuckDuckGo Not Working? Why & How to Fix it
Dec 8, 2025How to Register a Supercell ID Account?
Dec 8, 2025Spot Geek Squad Scams: Safety Tips 2025
Dec 8, 2025Top Questions
How to Find Windows 10 Product Key 2025?
Dec 8, 2025How to Increase Wifi Speed in laptop Windows 10?
Dec 8, 2025How to Convert FireWire Connections to USB?
Dec 8, 2025How do I Unlock my Keyboard on Windows 10?
Dec 8, 2025How to Create a Roku Channel in 3 Steps?
Dec 8, 2025How to Fix Gmail App Keeps Crashing Problem?
Dec 8, 2025Categories
- OTT
- 616 ~ Articles
- Windows
- 491 ~ Articles
- 164 ~ Articles
- Browser
- 145 ~ Articles
- Laptop
- 72 ~ Articles
- Antivirus
- 40 ~ Articles
Top Searches in Email
How to Register a Supercell ID Account?
Dec 8, 2025Top 10 Emails without Phone Number Verification - Free Emails Services
Dec 8, 2025How to Login Charter.net (Spectrum) Email?
Dec 8, 2025How to Login Network Solutions Webmail?
Dec 8, 2025How to Get Email Notifications on an iPhone
Dec 8, 2025How to Sign into Bresnan.net (Spectrum) Email?
Dec 8, 2025How to Add Your Yahoo Mail Signature
Dec 8, 2025How to Fix Problems Signing in to AOL Mail
Dec 8, 2025Why am I not Receiving Emails on Zoho
Dec 8, 2025How to Login to Telstra Bigpond Email?
Dec 8, 2025