Is there anyone who knows how to enable and disable the administrator account in Windows 10. I am facing some issues while using windows 10. Hwlp me.
You can use the hidden Administrator account in Windows 10 to manage all of the computer's resources. This account was readily available when you first set up your computer in prior versions of Windows, such as Windows XP.
The built-in administrator account is disabled by default starting with Windows Vista. We'll look at how to Enable and Disable the Administrator Account in Windows 10 in this article.
For security concerns, Windows 10 comes with a built-in Administrator account hidden and deactivated by default. You may need administrator access to perform some Windows management or troubleshooting or make changes to your account. You can enable the Administrator account for these reasons and then disable it when you're done.
.webp)
The quickest and easiest way to enable the Administrator account is to use the command prompt.
Step 1: By putting cmd in the search field, you can open a command prompt as an administrator.
Step 2: Right-click the entry for Command Prompt in the results and choose Run as Administrator.
Step 3: Type net user administrator at the command prompt. No should be the value for account Active.
Step 4: Type net user administrator /active: yes into the command prompt. You should get a response indicating that the command was executed correctly.
Step 5: Type net user administrator into the search box. Account Active should now be set to Yes.
Step 1: Administrative Tools can be accessed from the Start menu or the Control Panel.
Step 2: Open the folder for Local Users And Groups by selecting the Computer Management option. (You can get here faster by typing lusrmgr.msc into the Search bar.)
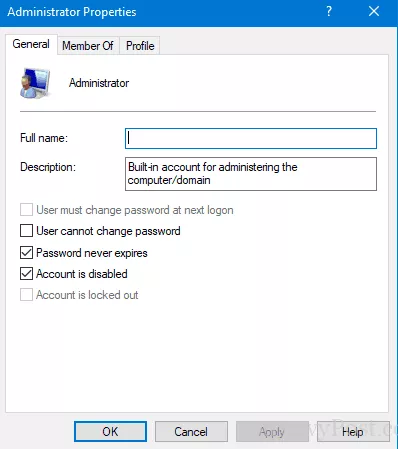
Step 3: Double-click on the Administrator account in the Users folder.
Step 4: Click OK or Apply after unchecking the Account Is Disabled option.
Step 5: The User Management window should now be closed.
Step 6: Log out while the account is active.
Sign in with the Administrator account after getting past the Lock screen. There is no need for a password. After that, you can do whatever management or troubleshooting you like.
You'll want to disable the Administrator account once you've finished your management or troubleshooting responsibilities. Follow these steps to do so.
Step 1: Log out and then log back in using your username and password.
Step 2: To validate that the account is active, open a command prompt as an administrator and type net user administrator.
Step 3: To check that the account is inactive, type net user administrator /active: no, then type net user administrator again.
Step 1: Double-click the Administrator account in the Local Users And Groups panel.
Step 2: Select the Account Is Disabled checkbox.
Step 3: Close the User Management window by clicking OK or Apply.
Windows 11 Controller not Working - How to Quickly Fix It?
How to Adjust Brightness, Screen Color, Contrast and Gamma on PC?
How to Clear Cache in Windows 11?
How to Format an NVME SSD on Windows 11?
How to Run Android Apps on Windows 10?
How to Change Monitor Number in Windows Display Settings?
How to Fix Game Opening on the Wrong Monitor?
How to Change the Keyboard Settings to Default on Windows 11?

How to Get Purble Place on Windows 11/10?
~ May 23, 2026
How to Check CPU Temperature Windows 11?
~ May 23, 2026
How to Record Your Screen on Windows 11
~ May 23, 2026How to Fix Icons in Windows 11
~ May 23, 2026
How do I Fix Error Code 0x80070570 on Windows 10
~ May 23, 2026
Fix Touchpad Gestures Are Not Working on Windows 11
~ May 23, 2026
How to Fix the WHEA Uncorrectable Error on Windows 10
~ May 23, 2026
Top Searches in Windows 10
How to Find Windows 10 Product Key 2026?
Dec 8, 2025How to Convert FireWire Connections to USB?
Dec 8, 2025How do I Unlock my Keyboard on Windows 10?
Dec 8, 2025How do I Fix the Unresponsive Taskbar in Windows 10?
Feb 23, 2024How to Install the Amazon Prime Video App on Windows 10?
Dec 8, 2025How to Recover Uninstalled Programs on Windows 10?
Dec 8, 2025Do I Really Need Realtek High Definition Audio in Windows 10?
Dec 8, 2025How to Enable Bitlocker on Windows 10 Home?
Dec 8, 2025How to Change Network Binding Order in Windows 10?
Dec 8, 2025How do I Turn Off Windows Volume Overlay?
Dec 8, 2025