Please let me know that how to fix a faulty ethernet connection in Windows 10. I am facing some issues in this. Help me.
If you can't connect to the internet via Ethernet cable, you'll need to troubleshoot the problem. You'll see that the PC doesn't recognize the ethernet connection if you launch the Network and Sharing Center. However, try to access the internet while connected to WiFi with the same connection.
You will be able to do so, indicating that the problem could be caused by incorrect network settings, corrupt or outdated network drivers, a damaged or malfunctioning ethernet cable, or other hardware difficulties.
.webp)
Users who prefer Ethernet over WiFi are experiencing a significant setback due to this problem, as they are unable to connect to the Internet via Ethernet cable. Unfortunately, faulty Ethernet Connection in Windows 10 is a common problem for updated or upgraded Windows 10.
Thankfully, there are numerous fixes available that appear to resolve this issue. So, without losing any time, let's check How to Fix Ethernet Not Working on Windows 10 using the troubleshooting guide listed below.
Before continuing, check sure you've completed the following basic steps to resolve the issue:
Step 1: If the particular port on the router is damaged, try connecting the ethernet wire to another port on the router.
Step 2: If the cable itself is damaged, try using a different cable.
Step 3: Unplug the cable and reconnect it again.
Step 4: To see if the problem is resolved, try connecting the Ethernet to another PC. If the second PC's ethernet works, your PC's hardware may be damaged, and you'll need to send it in for repair.
.webp)
You may use the built-in troubleshooting tool in Windows 10 to locate and resolve network-related issues. Here's how to put it to use:
Step 1: Go to Settings > Update & Security after clicking Start.
Step 2: Select Troubleshoot from the left pane menu.
Step 3: Click Network Adapter > Run the troubleshooter from the Find and fix other problems section.
Step 4: To begin troubleshooting, select Ethernet from the list of network adapters and then click Next.
The network adapter troubleshooter will look for any problems that could lead to an unsteady Ethernet connection. When the troubleshooter has finished scanning, it will display a report of the issues found. After that, all you have to do is fix them according to the directions provided.
.webp)
Step 1: To enter Settings, press Windows Key + I, then click the Network & Internet icon.
Step 2: Select status from the left-hand menu.
Step 3: Now, scroll down to the bottom of the Status page and click the Network Reset link.
Step 4: Click the "Reset now" option on the Network Reset page.
Step 5: Try connecting the Ethernet to the PC again to see if you can fix Ethernet not working in Windows 10.
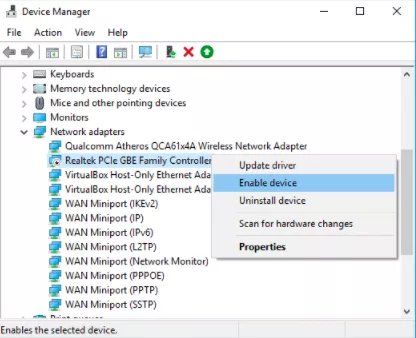
Step 1: Open Device Manager, press Windows Key + R, then type devmgmt. msc and press Enter.
Step 2: Expand Network adapters, then right-click on your Ethernet device and choose Enable from the menu that appears.
Step 3: Right-click it again and choose Update Driver.
Step 4: Select “Automatically search for updated driver software” and allow it to install any new drivers that are found.
Step 5: Reboot your computer to save your changes, and then verify whether Ethernet is still not working with Windows 10.
Step 6: If not, go back to Device Manager and right-click on your Ethernet device, then select Update Driver from the context menu.
Step 7: Choose “Browse my PC for driver software” this time.
Step 8: Now select "Let me choose from a list of available drivers on my computer" from the drop-down menu.
Step 9: Click Next after selecting the most recent Realtek PCIe FE Family Controller driver.
Step 10: Allow it to install the new drivers and then restart your pc.
.webp)
If the network troubleshooter fails to resolve the problem, you can also use Windows 10's Network Reset feature. This reinstalls all network adapters and restores the default settings for all network devices. To do it, follow these steps:
Step 1: After that, go to Settings > Network & Internet. You may check the status of your network here.
Step 2: Scroll down to the bottom of the page and click Reset Network.
Step 3: Reset now by pressing the Reset button. Windows 10 will restart your device after the procedure is completed.
However, you may need to reinstall your VPN, virtual switches, or any other networking software you're using after using Network Reset.
.webp)
If you need a quick fix, consider disabling any VPN software installed on your computer or laptop. To disconnect your manual VPN connection in Windows 10, follow these steps:
Step 1: Go to Settings > Network & Internet after clicking Start.
Step 2: Select VPN from the left pane menu.
Step 3: If you wish to delete your VPN, select it and click Disconnect or Remove.
Step 4: Also, any VPN plugins on your browser should be disabled or removed.
Final Words-
Your Ethernet connection may be disrupted due to a variety of factors. Start with the most straightforward fixes and work your way down the list to the more sophisticated answers if this happens to you.
Did you know that once your internet connection is restored, you may modify several Windows settings to make it even faster? There are lots you can do to squeeze those last few drops of speed out of your connection, from altering your router's channel to changing your DNS server.
Windows 11 Controller not Working - How to Quickly Fix It?
How to Adjust Brightness, Screen Color, Contrast and Gamma on PC?
How to Clear Cache in Windows 11?
How to Format an NVME SSD on Windows 11?
How to Run Android Apps on Windows 10?
How to Change Monitor Number in Windows Display Settings?
How to Fix Game Opening on the Wrong Monitor?
How to Change the Keyboard Settings to Default on Windows 11?

How to Get Purble Place on Windows 11/10?
~ May 23, 2026
How to Check CPU Temperature Windows 11?
~ May 23, 2026
How to Record Your Screen on Windows 11
~ May 23, 2026How to Fix Icons in Windows 11
~ May 23, 2026
How do I Fix Error Code 0x80070570 on Windows 10
~ May 23, 2026
Fix Touchpad Gestures Are Not Working on Windows 11
~ May 23, 2026
How to Fix the WHEA Uncorrectable Error on Windows 10
~ May 23, 2026
Top Searches in Windows 10
How to Find Windows 10 Product Key 2026?
Dec 8, 2025How to Convert FireWire Connections to USB?
Dec 8, 2025How do I Unlock my Keyboard on Windows 10?
Dec 8, 2025How do I Fix the Unresponsive Taskbar in Windows 10?
Feb 23, 2024How to Install the Amazon Prime Video App on Windows 10?
Dec 8, 2025How to Recover Uninstalled Programs on Windows 10?
Dec 8, 2025Do I Really Need Realtek High Definition Audio in Windows 10?
Dec 8, 2025How to Enable Bitlocker on Windows 10 Home?
Dec 8, 2025How to Change Network Binding Order in Windows 10?
Dec 8, 2025How do I Turn Off Windows Volume Overlay?
Dec 8, 2025