Hello Everyone, Please let me know that how to fix start button not working in windows 10? I am facing this issue last 1 week I don't know how to fix it. Help me.

At times, when you update your windows 10 with a new update, an issue occurs with your start button as it stops working. If that is the case, then the below guide will help you to fix Start Button not working in Windows 10.
Below are a Few Troubleshooting Steps to Resolve the Issue.
Step 1: Run Windows 10 start menu troubleshooter.
Step 2: Run system file checker.
Step 3: Repair windows system image.
Step 4: Create a new user.
Step 5: Uninstall the update causing the problems and then hide it.
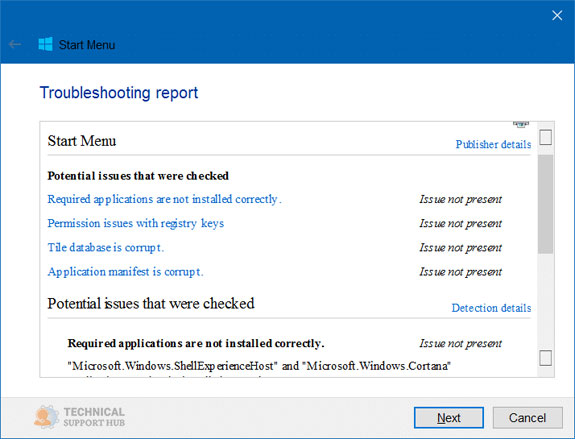
1. Download and run the Windows 10 start menu troubleshooter from Microsoft.
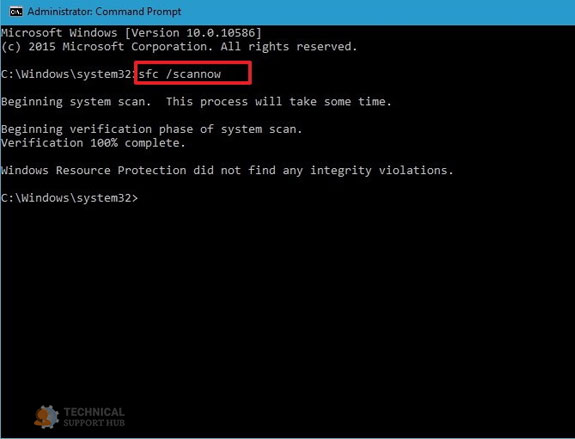
2. In order to run the system file checker, run the below-mentioned command in an elevated command prompt: sfc / scannow
Try restarting your system once the scanning will be completed and check if it helped to fix Start Button not working in Windows 10.
3. To Repair windows system image, go to an elevated CMD and copy-paste the below-mentioned command: Dism /Online /Cleanup-image /RestoreHealth
And now click Enter. After that try restarting your system once the scanning will be completed and check if it helped to fix Start Button not working in Windows 10.
4. Make start full screen and return back. Now, turn the tablet mode on and then return back again. After that check, if the toggling fixed the issue.
Get - AppXPackage - AllUsers | Foreach {Add - AppXPackage -DisableDevelopmentMode - Register} and press enter.
Steps to open an elevated PowerShell prompt: In the taskbar search, enter PowerShell, and “Windows PowerShell” will appear on the results displayed. You will have to right-click on it and then click on Run as administrator.
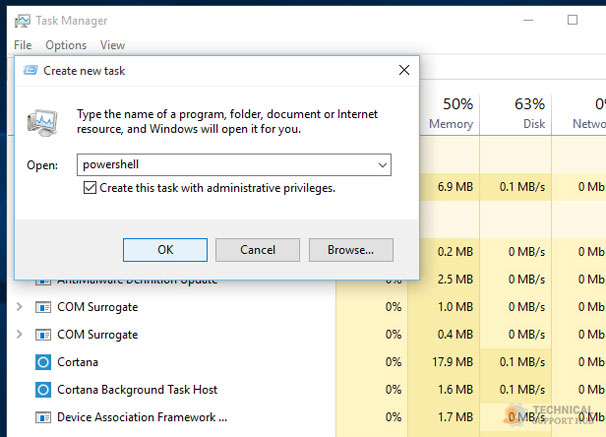
Or you can also open an elevated PowerShell prompt or Window by pressing Ctrl+Shift+Esc in order to open the task manager. Next, go to the File menu and then select Run new task. To open a command prompt window, type cmd. To open a PowerShell prompt, type Powershell. Remember to check the Create this task with administrative privileges check-box. Then press Enter.
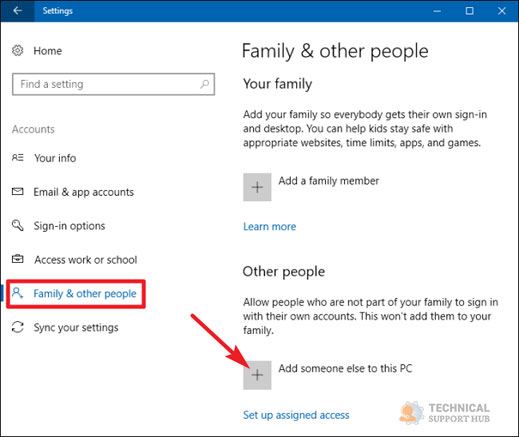
To do this, open an elevated command prompt window, type the following, and hit Enter: net user username /add
The username here will be your new user name. You will see The command completed successfully message. Log into your new account and see if it helped you to fix Start Button not working in Windows 10.
If the case is when your Cortana or taskbar search is not working then, go to Task Manager > File menu > click on Run new task. Enter PowerShell in the search bar and click on the Create this task with administrative privileges checkbox and then hit OK.
The most important point to remember while you perform these troubleshooting methods is to create a backup and restart the start menu in Windows 10 before you start. This is because if in case the methods didn’t resolve the issue then you can get back all your restored settings and data.
.jpg)
This is also one of the methods to fix the Start Button not working in Windows 10 or a frozen start menu. It is one of the easiest ways to resolve the issue and if it doesn’t work you can proceed with other troubleshooting methods.
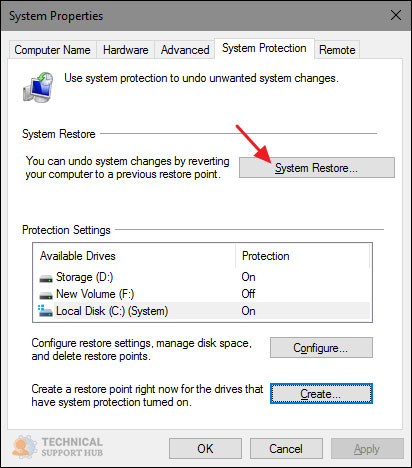
Although the Windows operating system creates a restore automatically from time to time by default. System Restore uses a feature called System Protection. It is a Windows feature that regularly creates and saves information about your computer’s system files, registry settings, and previous versions of files. But in case you want to create it manually while you are fixing the start button issue then below are the steps.
We hope the above article helped you to fix Start Button not working in Windows 10.
Windows 11 Controller not Working - How to Quickly Fix It?
How to Adjust Brightness, Screen Color, Contrast and Gamma on PC?
How to Clear Cache in Windows 11?
How to Format an NVME SSD on Windows 11?
How to Run Android Apps on Windows 10?
How to Change Monitor Number in Windows Display Settings?
How to Fix Game Opening on the Wrong Monitor?
How to Change the Keyboard Settings to Default on Windows 11?

How to Get Purble Place on Windows 11/10?
~ May 23, 2026
How to Check CPU Temperature Windows 11?
~ May 23, 2026
How to Record Your Screen on Windows 11
~ May 23, 2026How to Fix Icons in Windows 11
~ May 23, 2026
How do I Fix Error Code 0x80070570 on Windows 10
~ May 23, 2026
Fix Touchpad Gestures Are Not Working on Windows 11
~ May 23, 2026
How to Fix the WHEA Uncorrectable Error on Windows 10
~ May 23, 2026
Top Searches in Windows 10
How to Find Windows 10 Product Key 2026?
Dec 8, 2025How to Convert FireWire Connections to USB?
Dec 8, 2025How do I Unlock my Keyboard on Windows 10?
Dec 8, 2025How do I Fix the Unresponsive Taskbar in Windows 10?
Feb 23, 2024How to Install the Amazon Prime Video App on Windows 10?
Dec 8, 2025How to Recover Uninstalled Programs on Windows 10?
Dec 8, 2025Do I Really Need Realtek High Definition Audio in Windows 10?
Dec 8, 2025How to Enable Bitlocker on Windows 10 Home?
Dec 8, 2025How to Change Network Binding Order in Windows 10?
Dec 8, 2025How do I Turn Off Windows Volume Overlay?
Dec 8, 2025