Please let me know that how to increase VRAM in Windows 11. I am facing some issues while working on windows 11 laptop. It's showing me some type of error. Help me.
Did you ever get a warning regarding your Windows graphics card while playing a game? If yes, then you need a RAM and graphics card that meet the specifications of the games and apps installed on your computer.
This issue can be resolved simply by tweaking some things here and there. Here in this article, we are going to discuss how to increase VRAM in Windows 11. This is without a doubt one of the most efficient ways to get the most out of your PC.
Before we move on to the steps of increasing the VRAM, you must first learn how to check VRAM using Windows 11 settings.
If you wish to check video memory on your computer, then below mentioned are the steps that you need to follow.
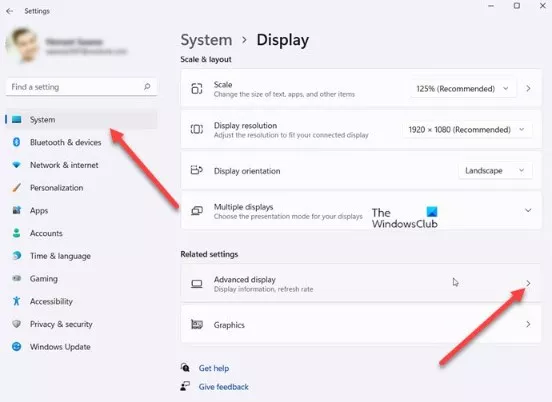
Step 1: Press the Windows and I key to launch the Settings menu. You can also right-click on the Settings menu and then select Settings.
Step 2: Go to the System Windows and then select the display option.
Step 3: Then, go down to the Advanced Display option.
Step 4: After that, select Display Adapter properties.
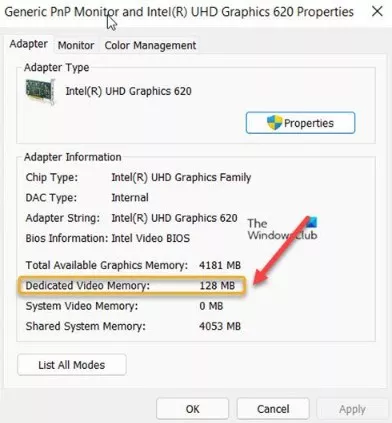
Step 5: Then, go to Dedicated Video Memory. There, you will see the video memory of your PC.
1) Use BIOS
Below are the steps that you need to follow to increase video memory in Windows 11.
Step 1: Restart your computer and then press the BIOS key again and again at the time of boot up. Press F2, F5, F8, or Delete key to use BIOS.
Step 2: Search for Advanced Features in the BIOS menu. After that search for VG share memory size option, Video Settings, or Graphics settings
Step 3: This will give you the option to change the amount of memory that has been allocated to the GPU. 128 MB is the default value. If there is enough memory, then you can increase the value up to 512 GB.
Step 4: After that, save the changes and restart your PC.
2) Use Registry Editor
Carry out the steps mentioned below to increase the video memory using the Registry editor.
Step 1: First of all, launch the Start menu and then type Run. After that, press Enter.
Step 2: Then, type Regedit to open the Registry Editor.
Step 3: After that, go to the path HKEY_LOCAL_MACHINE\Software\Intel
Step 4: Right-click on the intel folder from the panel on the left. Go to your mouse, hover over New and then click on Key.
Step 5: Give a name to the key and then click on it.
Step 6: Then, go to the right panel and then right-click inside it. After that, click on New and then select the DWORD menu.
Step 7: After that, name it dedicated segment size. Please keep in mind that the first letter of every word should be capitalized. Also, there shouldn't be any spaces between the words when you type them.
Step 8: Double-click on it and then select Hexadecimal. After that, you need to enter the recommended value data using your system's RAM information and then click on OK.
Windows 11 Controller not Working - How to Quickly Fix It?
How to Adjust Brightness, Screen Color, Contrast and Gamma on PC?
How to Clear Cache in Windows 11?
How to Format an NVME SSD on Windows 11?
How to Run Android Apps on Windows 10?
How to Change Monitor Number in Windows Display Settings?
How to Fix Game Opening on the Wrong Monitor?
How to Change the Keyboard Settings to Default on Windows 11?

How to Get Purble Place on Windows 11/10?
~ May 23, 2026
How to Check CPU Temperature Windows 11?
~ May 23, 2026
How to Record Your Screen on Windows 11
~ May 23, 2026How to Fix Icons in Windows 11
~ May 23, 2026
How do I Fix Error Code 0x80070570 on Windows 10
~ May 23, 2026
Fix Touchpad Gestures Are Not Working on Windows 11
~ May 23, 2026
How to Fix the WHEA Uncorrectable Error on Windows 10
~ May 23, 2026
Top Searches in Windows 11
How to Find Windows 10 Product Key 2026?
Dec 8, 2025How to Convert FireWire Connections to USB?
Dec 8, 2025How do I Unlock my Keyboard on Windows 10?
Dec 8, 2025How do I Fix the Unresponsive Taskbar in Windows 10?
Feb 23, 2024How to Install the Amazon Prime Video App on Windows 10?
Dec 8, 2025How to Recover Uninstalled Programs on Windows 10?
Dec 8, 2025Do I Really Need Realtek High Definition Audio in Windows 10?
Dec 8, 2025How to Enable Bitlocker on Windows 10 Home?
Dec 8, 2025How to Change Network Binding Order in Windows 10?
Dec 8, 2025How do I Turn Off Windows Volume Overlay?
Dec 8, 2025