Hi Everyone, Please let me know how to install the windows photo gallery on windows 10? I am facing this issue last 1 month I don't know how to install it. Help me.
In the below article we have shown you the steps to install the Windows Photo Gallery on Windows 10. But before we start, let us discuss what is Windows photo gallery.
Step 1: Firstly, open the Windows Essentials download page and then download Windows Essentials.
Step 2: Next, run the wlsetup-web file (which you downloaded in the first step) and wait for the process to prepare itself.

Step 3: In the next screen, click on the “Choose the programs you want to install”.
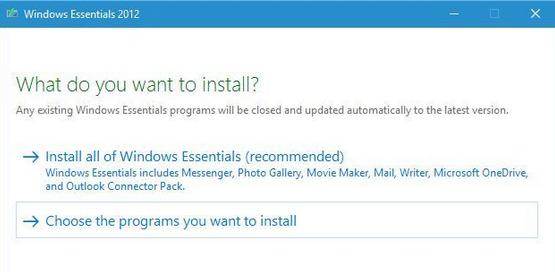
Step 4: Now choose Photo Gallery and Movie Maker and then Click on the Install button to start the installation. Wait until the installation process is completed.

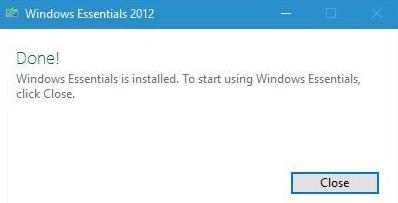
Step 5: As soon as the setup process is completed, hit the “close” button.
Windows photo gallery is a photo editing app and Image enhancer. Previously, it was designed for a Windows Picture and Fax Viewer. The software’s first version was included in Windows Vista.
The first version was developed in December 2001 as a Photo Library and it was released under the Digital Image Suite 9 on June 3, 2003. The last Photo Library branded software was released on April 22, 2005.
After a while, it turned into a Windows photo gallery with all the earlier versions of Windows Vista. In the same year, Microsoft changed the application’s name to Windows live photo gallery and the very first version of this software was released in 2007. There have been a lot of changes made to this application since then.
The changes include image stitching, facial recognition, tagging, organizing photos by adding titles, captions, metatags, and XMP metadata standard that helps you to categorize your pictures accordingly. Apart from that, the features such as basic photo editing (crop, resize, filter, adjust shades etc.) and batch resizing of photos (resize multiple photos at once).
Next, double click on the photo gallery shortcut from the desktop. The moment it will open, you will see an error message saying “Photo Gallery requires Microsoft SQL server 2005 compact edition in order to run”. Once you download it, the application will start running immediately.
Again as soon as you start the application the screen will display a list of thumbnails from your Pictures folder, yet you can add any other folder to Photo Gallery with ease.
To add the tags, geotags, captions, and metatags, you will have to double click on the thumbnail to view the image.
Apart from that, you can also choose between several colour and exposure presets and you can also alter all of these options manually. In addition to that, you can also opt for colour correction options by clicking on the options displayed on the top of the screen. And once you are done with all the changes, you can save the edited image as a copy and let the original image stay as it is.
We hope the above article helped you to install the Windows Photo Gallery on Windows 10.
Windows 11 Controller not Working - How to Quickly Fix It?
How to Adjust Brightness, Screen Color, Contrast and Gamma on PC?
How to Clear Cache in Windows 11?
How to Format an NVME SSD on Windows 11?
How to Run Android Apps on Windows 10?
How to Change Monitor Number in Windows Display Settings?
How to Fix Game Opening on the Wrong Monitor?
How to Change the Keyboard Settings to Default on Windows 11?

How to Get Purble Place on Windows 11/10?
~ May 23, 2026
How to Check CPU Temperature Windows 11?
~ May 23, 2026
How to Record Your Screen on Windows 11
~ May 23, 2026How to Fix Icons in Windows 11
~ May 23, 2026
How do I Fix Error Code 0x80070570 on Windows 10
~ May 23, 2026
Fix Touchpad Gestures Are Not Working on Windows 11
~ May 23, 2026
How to Fix the WHEA Uncorrectable Error on Windows 10
~ May 23, 2026
Top Searches in Windows 10
How to Find Windows 10 Product Key 2026?
Dec 8, 2025How to Convert FireWire Connections to USB?
Dec 8, 2025How do I Unlock my Keyboard on Windows 10?
Dec 8, 2025How do I Fix the Unresponsive Taskbar in Windows 10?
Feb 23, 2024How to Install the Amazon Prime Video App on Windows 10?
Dec 8, 2025How to Recover Uninstalled Programs on Windows 10?
Dec 8, 2025Do I Really Need Realtek High Definition Audio in Windows 10?
Dec 8, 2025How to Enable Bitlocker on Windows 10 Home?
Dec 8, 2025How to Change Network Binding Order in Windows 10?
Dec 8, 2025How do I Turn Off Windows Volume Overlay?
Dec 8, 2025