Is there anyone who knows about how to set up Multi-User network in QuickBooks desktop. I am facing some isues while doing this. Help me.
QuickBooks is considered to be an impressive accounting software developed till now. It is high-yielding and lets one handle it in the most appropriate yet dignified way. It has a variety of new features but the special one is the multi-user mode.
Multi-user mode helps the users to connect and access the same data at the same time in the same network. If you are curious about understanding how to set up multi-user network in QuickBooks desktop, then you are at the right site.
Here’s how:
When on a multi-user network, one computer hosts all the files required which becomes our server computer whereas the other computers connected are deemed as workstations that do not host the files yet are connected to the network.
Follow the steps to establish folder permissions in your server pc. Before doing so, just cross check and make sure that the folder containing your docs has its permissions to access your network.
.webp)
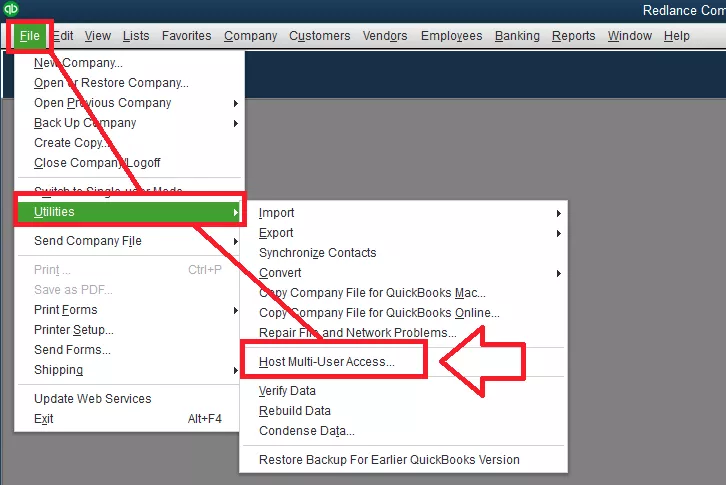
As you have already done Step 1, you might have observed that this software installs “QuickBooks Database Server Manager in your server pc. This implementation helps you to proportion your enterprise documents with different computer systems over your network.
Ensure that the user account you operate additionally has windows access rights too.
In addition to this, just make sure that your Windows User for Database Server Manager has administrator access to manage the functions.
So now we have already done the set up so we can move to the next process. Just click on “Multi-user access”.
Now you can host your agency files over your network. Happy net-working!!
Windows 11 Controller not Working - How to Quickly Fix It?
How to Adjust Brightness, Screen Color, Contrast and Gamma on PC?
How to Clear Cache in Windows 11?
How to Format an NVME SSD on Windows 11?
How to Run Android Apps on Windows 10?
How to Change Monitor Number in Windows Display Settings?
How to Fix Game Opening on the Wrong Monitor?
How to Change the Keyboard Settings to Default on Windows 11?

How to Get Purble Place on Windows 11/10?
~ May 23, 2026
How to Check CPU Temperature Windows 11?
~ May 23, 2026
How to Record Your Screen on Windows 11
~ May 23, 2026How to Fix Icons in Windows 11
~ May 23, 2026
How do I Fix Error Code 0x80070570 on Windows 10
~ May 23, 2026
Fix Touchpad Gestures Are Not Working on Windows 11
~ May 23, 2026
How to Fix the WHEA Uncorrectable Error on Windows 10
~ May 23, 2026
Top Searches in Windows 10
How to Find Windows 10 Product Key 2026?
Dec 8, 2025How to Convert FireWire Connections to USB?
Dec 8, 2025How do I Unlock my Keyboard on Windows 10?
Dec 8, 2025How do I Fix the Unresponsive Taskbar in Windows 10?
Feb 23, 2024How to Install the Amazon Prime Video App on Windows 10?
Dec 8, 2025How to Recover Uninstalled Programs on Windows 10?
Dec 8, 2025Do I Really Need Realtek High Definition Audio in Windows 10?
Dec 8, 2025How to Enable Bitlocker on Windows 10 Home?
Dec 8, 2025How to Change Network Binding Order in Windows 10?
Dec 8, 2025How do I Turn Off Windows Volume Overlay?
Dec 8, 2025