Is there anyone who knows about how to fix wifi doesnt have a valid IP configuration in Windows 10. I am facing some issues while using Windows 10. Help me.
A Wi-Fi network is exactly what you need if you don't want too many wires and wish to move your laptop to another location. Wi-Fi can be extremely useful but a lot of people have mentioned that they are facing the Wi-Fi does not have a valid IP configuration message.
This error will stop you from using your Wi-Fi. Below, we have mentioned some solutions that can help you fix these errors. So, let's read them out one by one.
Below are the easy steps that you are required to follow in order to uninstall your wireless adapter driver.
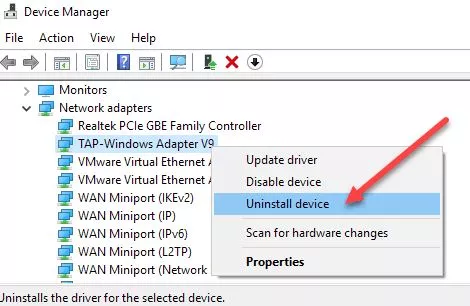
Step 1: Press the Windows key and X key simultaneously to select Device manager.
Step 2: Start looking for your wireless device and then right-click on it. After that, select the option of Uninstall Device.
Step 3: If available, check the box of Delete driver software for this device and then select OK.
Step 4: Restart your computer

Step 1: Start searching for cmd and then select the option of Run as administrator to open Command Prompt.
Step 2: Now, enter the following two commands.
Step 3: Close the command prompt and then restart your computer system.
Keep in mind that if you use a static IP address, then you need to set it again. In case the above commands didn't work, then try the 3 commands mentioned below.
In case you are not able to enter the commands mentioned above using the command prompt, then you can read a troubleshooting guide to fix this problem.

You can easily resolve your Wi-Fi doesn't have a valid IP configuration error by accessing your modem and changing the password and wireless SSID. For this, you need to connect your modem to the computer using an ethernet cable.
Now, access the modem to change the SSID and password. If you wish to know more about how you can do this, then you must check the manual of your modem.
Below are the simple steps that you need to perform to set the channel width to auto.
Step 1: Press the Windows key and X key simultaneously. After that, go to the menu and choose the option of Network Connections.
Step 2: Go to wireless connections and then right-click on it. Then, select Properties from the main menu.
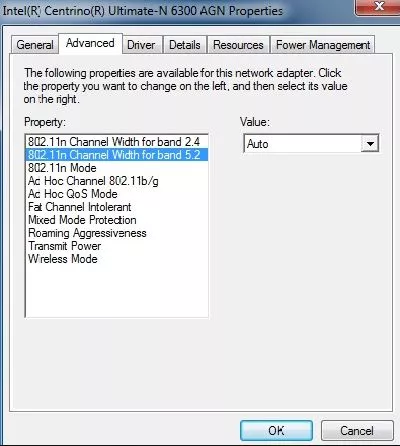
Step 3: Select the configure button and then click on the Advanced tab.
Step 4: Search for the 802.11n Channel Width for 2.4 band and then select Auto.
Step 5: Now, save changes by clicking on OK.
Below are the steps that you need to follow to set the IP address manually.
Step 1: Press the Windows key and X key simultaneously and then select Network Connections.
Step 2: Go to your wireless network and then right-click on it. After that, go to the menu and select Properties from there.
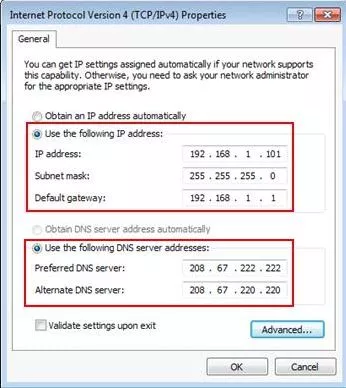
Step 3: Choose Internet Protocol version 4 and then select the button of properties.
Step 4: Select use the following IP address option and then type the IP address. Also, enter subnet mask and default gateway.
Step 5: Once you are done, select OK.
Windows 11 Controller not Working - How to Quickly Fix It?
How to Adjust Brightness, Screen Color, Contrast and Gamma on PC?
How to Clear Cache in Windows 11?
How to Format an NVME SSD on Windows 11?
How to Run Android Apps on Windows 10?
How to Change Monitor Number in Windows Display Settings?
How to Fix Game Opening on the Wrong Monitor?
How to Change the Keyboard Settings to Default on Windows 11?

How to Get Purble Place on Windows 11/10?
~ May 23, 2026
How to Check CPU Temperature Windows 11?
~ May 23, 2026
How to Record Your Screen on Windows 11
~ May 23, 2026How to Fix Icons in Windows 11
~ May 23, 2026
How do I Fix Error Code 0x80070570 on Windows 10
~ May 23, 2026
Fix Touchpad Gestures Are Not Working on Windows 11
~ May 23, 2026
How to Fix the WHEA Uncorrectable Error on Windows 10
~ May 23, 2026
Top Searches in Windows 10
How to Find Windows 10 Product Key 2026?
Dec 8, 2025How to Convert FireWire Connections to USB?
Dec 8, 2025How do I Unlock my Keyboard on Windows 10?
Dec 8, 2025How do I Fix the Unresponsive Taskbar in Windows 10?
Feb 23, 2024How to Install the Amazon Prime Video App on Windows 10?
Dec 8, 2025How to Recover Uninstalled Programs on Windows 10?
Dec 8, 2025Do I Really Need Realtek High Definition Audio in Windows 10?
Dec 8, 2025How to Enable Bitlocker on Windows 10 Home?
Dec 8, 2025How to Change Network Binding Order in Windows 10?
Dec 8, 2025How do I Turn Off Windows Volume Overlay?
Dec 8, 2025