Is there anyone who knows about how to remove temporary files on Windows 10. I want to delete it but don't know about this. Help me.
In this guide, you may find out how to quickly remove temporary files on Windows 10 to release area or reclaim cupboard space when putting in a feature update.
.webp)
On Windows 10, you'll be able to use the Settings app to get rid of temporary files manually or mechanically. However, the steps are going to be slightly totally different depending on the discharge you've got put in on the pc.
.webp)
Follow the steps below:
After you complete the steps, junk files are going to be off from your laptop, releasing up area for a lot of necessary files.
To manually take away temporary files using the Settings app on version 1809 and older releases, use these steps:
Step 1: Open Settings.
Step 2: Click on System.
Step 3: Click on Storage.
Step 4: Click the release area currently a possibility.
Select the files you would like to delete, including:
Step 6: Click the takeaway files button.
After you finish the steps, the selected files will be permanently deleted from your laptop releasing up area for a lot of valuable files.
If you decide to delete the files from a previous version of Windows 10, take into account that you simply won’t be ready to roll back to the sooner version while not these files. However, when a feature update installs on your device, the software package mechanically removes these files anyway when 10 days.
Alternatively, you'll be able to use “Storage sense” to mechanically release the area by removing those temporary files and con10t from the recycle bin.
To delete files wasting area automatically through Storage Sense on Windows 10 version 1903 or later releases:
After you complete the steps, Storage sense can delete most temporary files and people files that are within the recycle bin for quite thirty days.
To delete files wasting area mechanically using Storage Sense on Windows 10 version 1809 or earlier releases:
(Optional) Click the “Change however we have a 10dency to release area” choice to schedule automatic cleanup or run Storage sense on-demand to release space on Windows 10.
Once you complete the steps, Windows 10 can automatically delete temporary files.
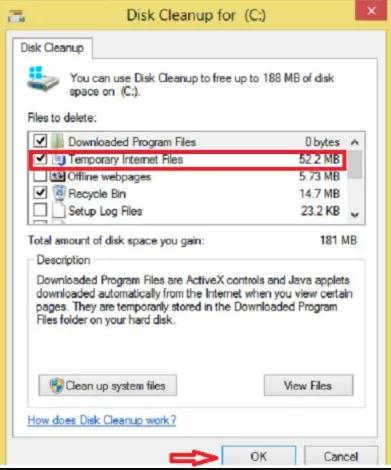
If you're obtaining a message concerning your device running out of the area, you'll be able to conjointly use the Disk Cleanup tool to delete temporary files to release the area on your device.
To remove temporary files with the Disk Cleanup, follow below the steps:
Once you complete the steps, temporary files can for good be deleted from your laptop, creating space for brand new files.
Windows 11 Controller not Working - How to Quickly Fix It?
How to Adjust Brightness, Screen Color, Contrast and Gamma on PC?
How to Clear Cache in Windows 11?
How to Format an NVME SSD on Windows 11?
How to Run Android Apps on Windows 10?
How to Change Monitor Number in Windows Display Settings?
How to Fix Game Opening on the Wrong Monitor?
How to Change the Keyboard Settings to Default on Windows 11?

How to Get Purble Place on Windows 11/10?
~ May 23, 2026
How to Check CPU Temperature Windows 11?
~ May 23, 2026
How to Record Your Screen on Windows 11
~ May 23, 2026How to Fix Icons in Windows 11
~ May 23, 2026
How do I Fix Error Code 0x80070570 on Windows 10
~ May 23, 2026
Fix Touchpad Gestures Are Not Working on Windows 11
~ May 23, 2026
How to Fix the WHEA Uncorrectable Error on Windows 10
~ May 23, 2026
Top Searches in Windows 10
How to Find Windows 10 Product Key 2026?
Dec 8, 2025How to Convert FireWire Connections to USB?
Dec 8, 2025How do I Unlock my Keyboard on Windows 10?
Dec 8, 2025How do I Fix the Unresponsive Taskbar in Windows 10?
Feb 23, 2024How to Install the Amazon Prime Video App on Windows 10?
Dec 8, 2025How to Recover Uninstalled Programs on Windows 10?
Dec 8, 2025Do I Really Need Realtek High Definition Audio in Windows 10?
Dec 8, 2025How to Enable Bitlocker on Windows 10 Home?
Dec 8, 2025How to Change Network Binding Order in Windows 10?
Dec 8, 2025How do I Turn Off Windows Volume Overlay?
Dec 8, 2025