Is there anyone who knows about how to change input on Roku tv. I am facing some issues while changing Roku input setting. Help me.
The TCL Roku TV interface differs somewhat from that of other televisions. The majority of individuals are accustomed to using their remote's "Input" button to change inputs. Things are a little different with the TCL Roku TV. A Roku TV combines the functionality of a Roku — which is essentially a gadget that provides you access to hundreds of streaming services — with the convenience of a smart TV.
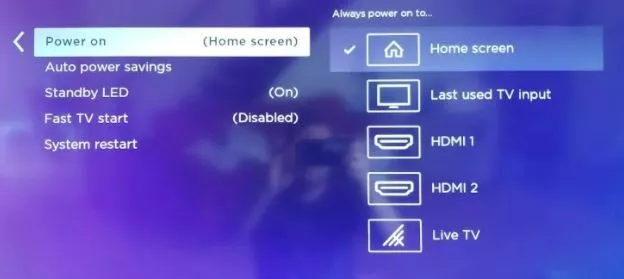
One of these fantastic features is the option for the user to change the default input source for the Roku TV when it comes on. You may set it as the default if you're a conventional TV watcher who still uses a cable box as your primary watching device. A game console or Blu-ray player are examples of these.
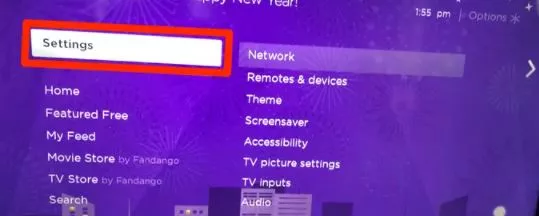
Step 1: To access the menu, hit the left arrow on the Home screen, then pick "Settings" from the left pane.
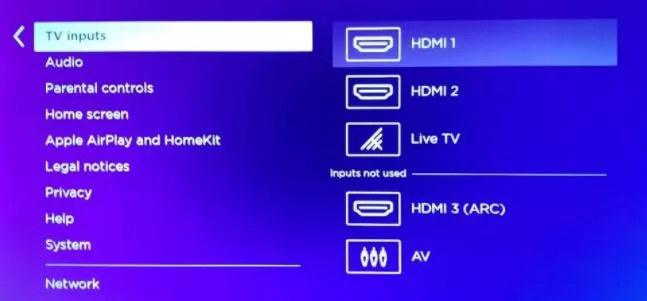
Step 2: Select "TV Inputs" and then "OK."
Step 3: To the right, a menu will emerge from which you may select the required input (HDMI 1, HDMI 2, Live TV, etc.)
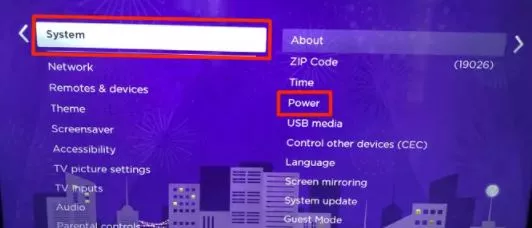
The ability to select the input utilised when the TCL Roku TV is turned on is found in a separate set of options.
Roku TV has grown in popularity over the years as a result of its quick and easy-to-use streaming services. Roku TV is a one-of-a-kind smart TV that allows customers access to every major streaming service without the need for any additional streaming boxes.
However, if you choose to use another streaming device, such as an Apple TV, Amazon Fire TV, or Android TV box, you may do so while still using your Roku. You may accomplish this by changing the input on your Roku TV.
The Roku TV is distinct from other television brands. It has a versatile advantage over other brands because of its distinct interface and functionality. Roku TV gives consumers access to a wealth of features and streaming providers. The option to select the input source the Roku TV defaults to when switched on is one of Roku's most impressive features.
Users who utilise a cable box as their primary decoder will appreciate this benefit. Users with a gaming console or Blu-ray player may also take advantage of this capability. Roku TV differs from conventional televisions in that it does not have an Input button on the remote control. Changing the input on a Roku TV is a reasonably simple operation.
Changing the input on a Roku TV is a separate process from setting the default input. The following is a step-by-step explanation of how to change HDMI on Roku tv:
Step 1: Press the Home button on the Roku TV remote control.
Step 2: Select Settings will appear on the left pane if you press the left arrow.
Step 3: Select TV Inputs from the drop-down menu.
Step 4: To bring up an option prompt – HDMI 1, HDMI 2, Live TV, etc. – press OK.
Step 5: Choose your chosen input – HDMI 1, HDMI 2, Live TV, etc. – from the prompt.
Conclusion
As previously said, altering or configuring your Roku input is rather simple. The transition from one input to the next is smooth. Setting a default input is also simple. Everything saves instantly once you've made your decision. If you ever need to change the input, you may do it by pressing the home button on your remote control.
How to Fix Your Roku Voice or Simple Remote that is not Working?
How to Connect Airpods to Roku TV?
How to Fix Roku Error Code 014.30?
How to Fix It When Disney Plus is not Working on Roku?
How to Pick the Right Roku for Your TV?
How to Fix It When Roku TV Sound is not Working
How to Fix Roku TV Apps not Working?
~ May 23, 2026
How to Install Zwift on Roku Connected TV?
~ May 23, 2026
How to Register MagicJack With and Without a Computer?
~ May 23, 2026
How to Connect magicjack to Wifi?
~ May 23, 2026
How to Fix a Black Screen on Roku?
~ May 23, 2026
How to Turn Off HDR on Roku TV?
~ May 23, 2026

Top Searches in Roku Streaming
How do I Connect Roku TV to Wifi Without a Remote?
Jan 3, 2025How to Fix Roku Remote Green Light Flashing Issues?
Dec 8, 2025How to Create a Roku Channel in 3 Steps?
Dec 8, 2025How do I Activate my Roku Without Paying?
Dec 8, 2025How to Disable or Block Ads on Roku or Roku TV Home Screen?
Dec 8, 2025How do I Get a Link Code for Roku TV?
Dec 8, 2025How to Stream Fios TV on Roku Connected TV?
Dec 8, 2025How to Login magicJack Account - My.MagicJack.com
Dec 8, 2025How to Watch Cox Contour on Roku?
Dec 8, 2025How Can I Port my magicJack Number to Another Provider?
Dec 8, 2025